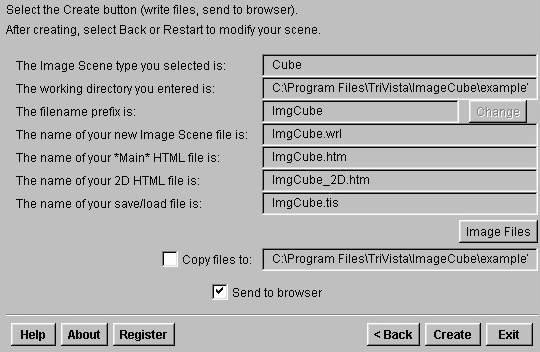
Screen 5
This final screen provides a summary of the file information pertaining to your 3D image cube or carousel. The information provided includes the type of object (cube or carousel), the working directory, which is where the images reside and where the Image Cube or Carousel files will be written, the prefix for all files, and the specific image cube filenames. In this case, the default prefix of ImgCube was used.
For this example, the main file which will be opened by the browser is ImgCube.htm. This is the 2D, HTML file which contains the document title, page caption, and an embedded 3D VRML scene of the cube or carousel. The 3D VRML file is called ImgCube.wrl. ImgCube_2D.htm is the file which is opened when the user clicks on "View a 2D version" from the main page.
The file ImgCube.tis contains a saved description of the 3D Image cube or carousel which is used by the 3D ImageCube software. The purpose of this file is to make it easy to restart the program in a later session, starting with a previously saved cube or carousel. This is the file name you would enter or select via browse on the first screen, if you wanted to load this scene back into the software to make some changes. You don't have to ask for a .tis file to be created or updated --- it will happen automatically, each time you create or modify a 3D ImageCube scene!
Clicking the "change" button next to the filename prefix brings up a type-in that will allow you to change the prefix which will be applied to all of the filenames described above. This button is grayed out (inactive) for unregistered users. For example, if you entered "MyNewCube" in the type-in, the files created would be called MyNewCube.htm, MyNewCube.wrl, MyNewCube_2D.htm, and MyNewCube.tis.
Note: It is not sufficient simply to rename the files after creation, because some of them contain links to other files. For example, MyNewCube.htm contains a line which embeds the scene in MyNewCube.wrl. The automated file naming of 3D ImageCube is designed to make things easy --- you never have to see, or worry about, all the names and links. The easiest way to manage filenames is by registering the code, then using the change prefix option to name your myriad creations.
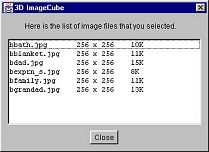
Clicking on the "Image Files" button will bring up a list of the six files along with the resolution of the images and file sizes. It's a good idea to check this information before publishing a cube or carousel on the Web, especially if warnings were issued back at the image selection stage. You can find tips and tricks about image sizing in the Help file for that screen (Screen 2). An example of the Image Files information is shown below.
Referring again to the final screen (Screen 5), if the "Copy files to:" box is checked, all of the files associated with the image cube or carousel (including the 6 images) will be copied to a directory with the same name as the filename prefix. This will simplify the process of publishing your image cube or carousel to the Web. For example, if you use an Internet service provider (ISP) to host your Website, you can copy all of the files from this directory to a directory on your Website. Similarly, you may like to Zip up this directory of files and email it to a friend or relative. When publishing your cube or carousel, remember that the main file is called ImgCube.htm or YourPrefixHere.htm --- this is the file to refer to when linking to your new Web page.
If the "Send To Browser" box is checked (default), after you click Create, your image cube or carousel will be sent to your Web browser for you to see and interact with. If your browser is not currently running, it will be started up for you automatically.
At this point click "Create" to generate your 3D image cube or carousel. If the filename prefix you have selected already exists, you will be presented with the following screen.
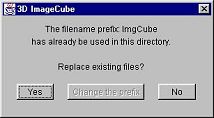
Clicking yes will use the same prefix name and replace all of the existing files with the current ones. Clicking "Change the prefix" (only available to registered users) will bring up a type-in allowing you to enter a new filename prefix to use. Clicking "No" will bring you back to the final screen where you can click back to make some changes, or click Exit to exit.
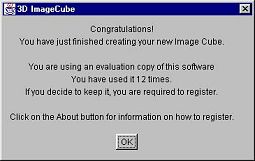
Once you have chosen a unique prefix or have answered "Yes" to replace existing files, A final "Congratulations" screen will appear. Unregistered users will be told how many times they have used the product and reminded to register.
If you have the "Send to Browser" button selected on the final screen, the browser window will be brought up and your image cube or carousel will be displayed. If your browser does not support viewing VRML 2.0 files, please visit our Website at http://www.trivista.com/vrml for information on how to download a VRML 2.0 viewer.
Finally, once you have selected "Create," a "Restart" button will
appear next to the Back button. If you wish to make changes to the cube or carousel,
simply hit Back one or more times, or Restart to jump to the first screen again --- in
either case, all of the previous information is retained until you change it.
Remember: a .tis file is saved automatically, every time you create or update a 3D
ImageCube cube or carousel. Once you Exit the code, you can always come back --- in
moments or days --- and easily modify your creations with just a few additional clicks.